
Table of Contents
- Eliminate Floor Construction Risks for Projects Success
- Traditional Floor Construction Inspections are Outdated
- Imerso’s 3-Steps For Ensuring Quality in Floor Construction
- When and Where Should You Use Imerso For Floor Construction Inspections?
- Conclusion
Eliminate Floor Construction Risks for Projects Success
Defects or any out-of-tolerance elevations and depressions can lead to dramatic problems and costs that worsen further throughout the building's life cycle.
Addressing floor construction risks early in the project will help you to:
- Improve your teams’ efficiency and productivity, and eliminate delays.
- Prevent accidents, injuries, and property damage.
- Avoid legal consequences, including penalties, fines and potential litigation.
- Reduce the financial burden associated with worker compensation claims, medical expenses, insurance premiums, and potential project delays.
- Ensure high building quality standards for the entire building lifecycle.
By establishing a proactive risk management strategy, you can reach significant cost savings both during the construction phase and in the long run.
Traditional Floor Construction Inspections are Outdated
Manual inspections with level, straightedge rulers, total stations, or similar methods require a lot of time and resources and are often inaccurate or with sparse information. Things get even harder if a project must comply with strict standards such as the DIN18202 for surface analysis, which require measurement of floor slabs in very specific ways.
Sounds familiar? Well, this problem is very common.
A few months ago, our client Drees & Sommer faced a similar challenge and together we looked for an efficient solution to this problem.
We found it!
We named the tool Surface Analyser, and made it a standard feature on the Imerso platform for all our clients, as everyone is super excited to use it.
Surface Analyser leverages accurate As Built data captured from the site in the form of 3D scans (also known as point clouds) and automatically verifies work quality and floor surface compliance. This includes both colour-coded heatmap visualisations of elevations and depressions above your tolerance parameters and DIN18202 measurement grids.
Breaking news: Iconic Hospital Construction Site in Denmark Uses Imerso AI to Boost Productivity Worth 2% of its Construction Budget.>>
Imerso’s 3-Steps For Ensuring Quality in Floor Construction
Step 1: Load Your Scans into Imerso
To use the Surface Analyser, log into your project and load the area you wish to check.
You can check surface flatness against scans made with any scanner, including Leica BLK360, RTC360, Trimble X7, Faro Focus, NavVis VLX or similar.
Step 2: Check Your Scans vs BIM: DIN 18202, Slope and Scan Deviation Grids
Now you can start measuring surfaces via:
- DIN 18202 grid method, grid method shows you the measured value at each grid intersection (horizontal and vertical). Measurements that are outside the standard are highlighted so you can concentrate on areas where the floor is not as flat as required. This method is suitable for determining whether the surface is flat or uneven.
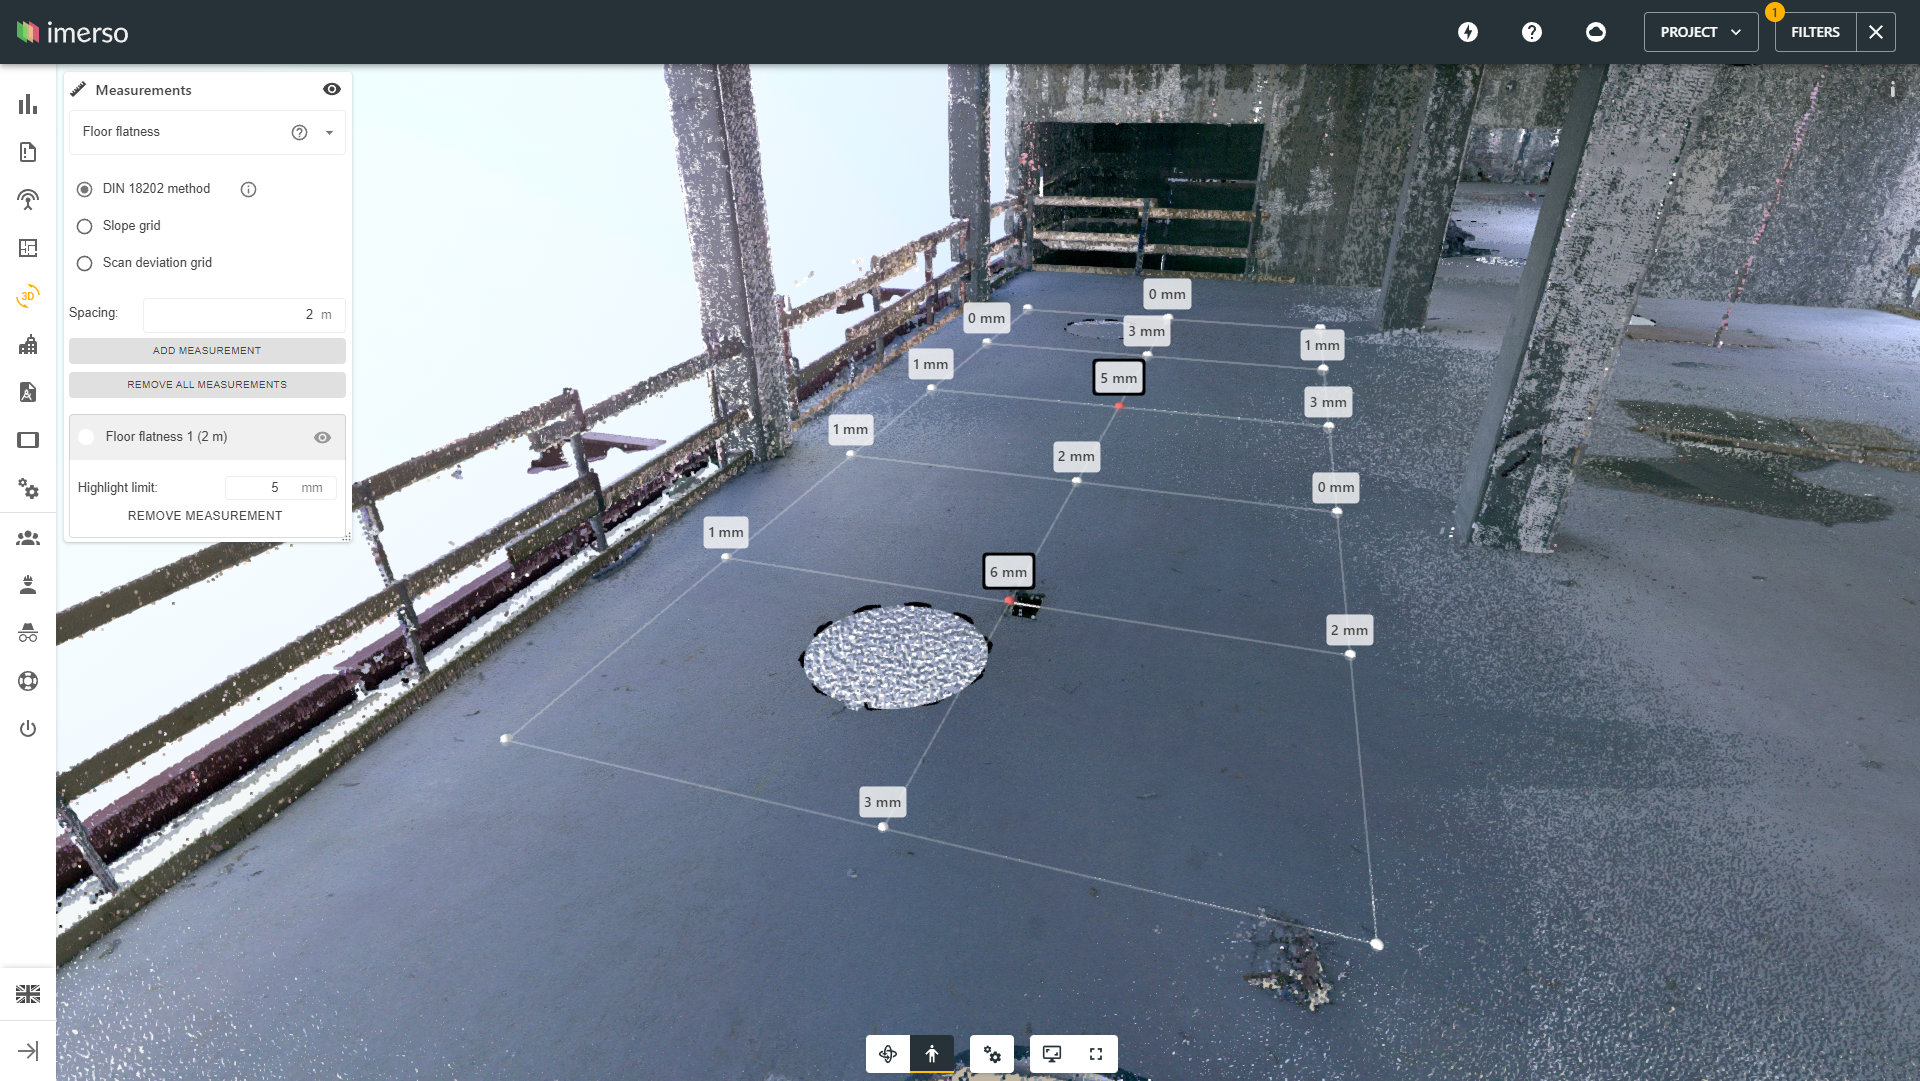 You can use the DIN 18202 grid to define tolerance limits in accordance with the standards. These tolerance limits often depend on the construction phase and project type. For example, the tolerance is 15 mm for unprepared concrete slabs in a 1x1 meter grid. You can also set a grid of 4x4 meters - this is done dynamically with a few clicks on the Imerso platform.
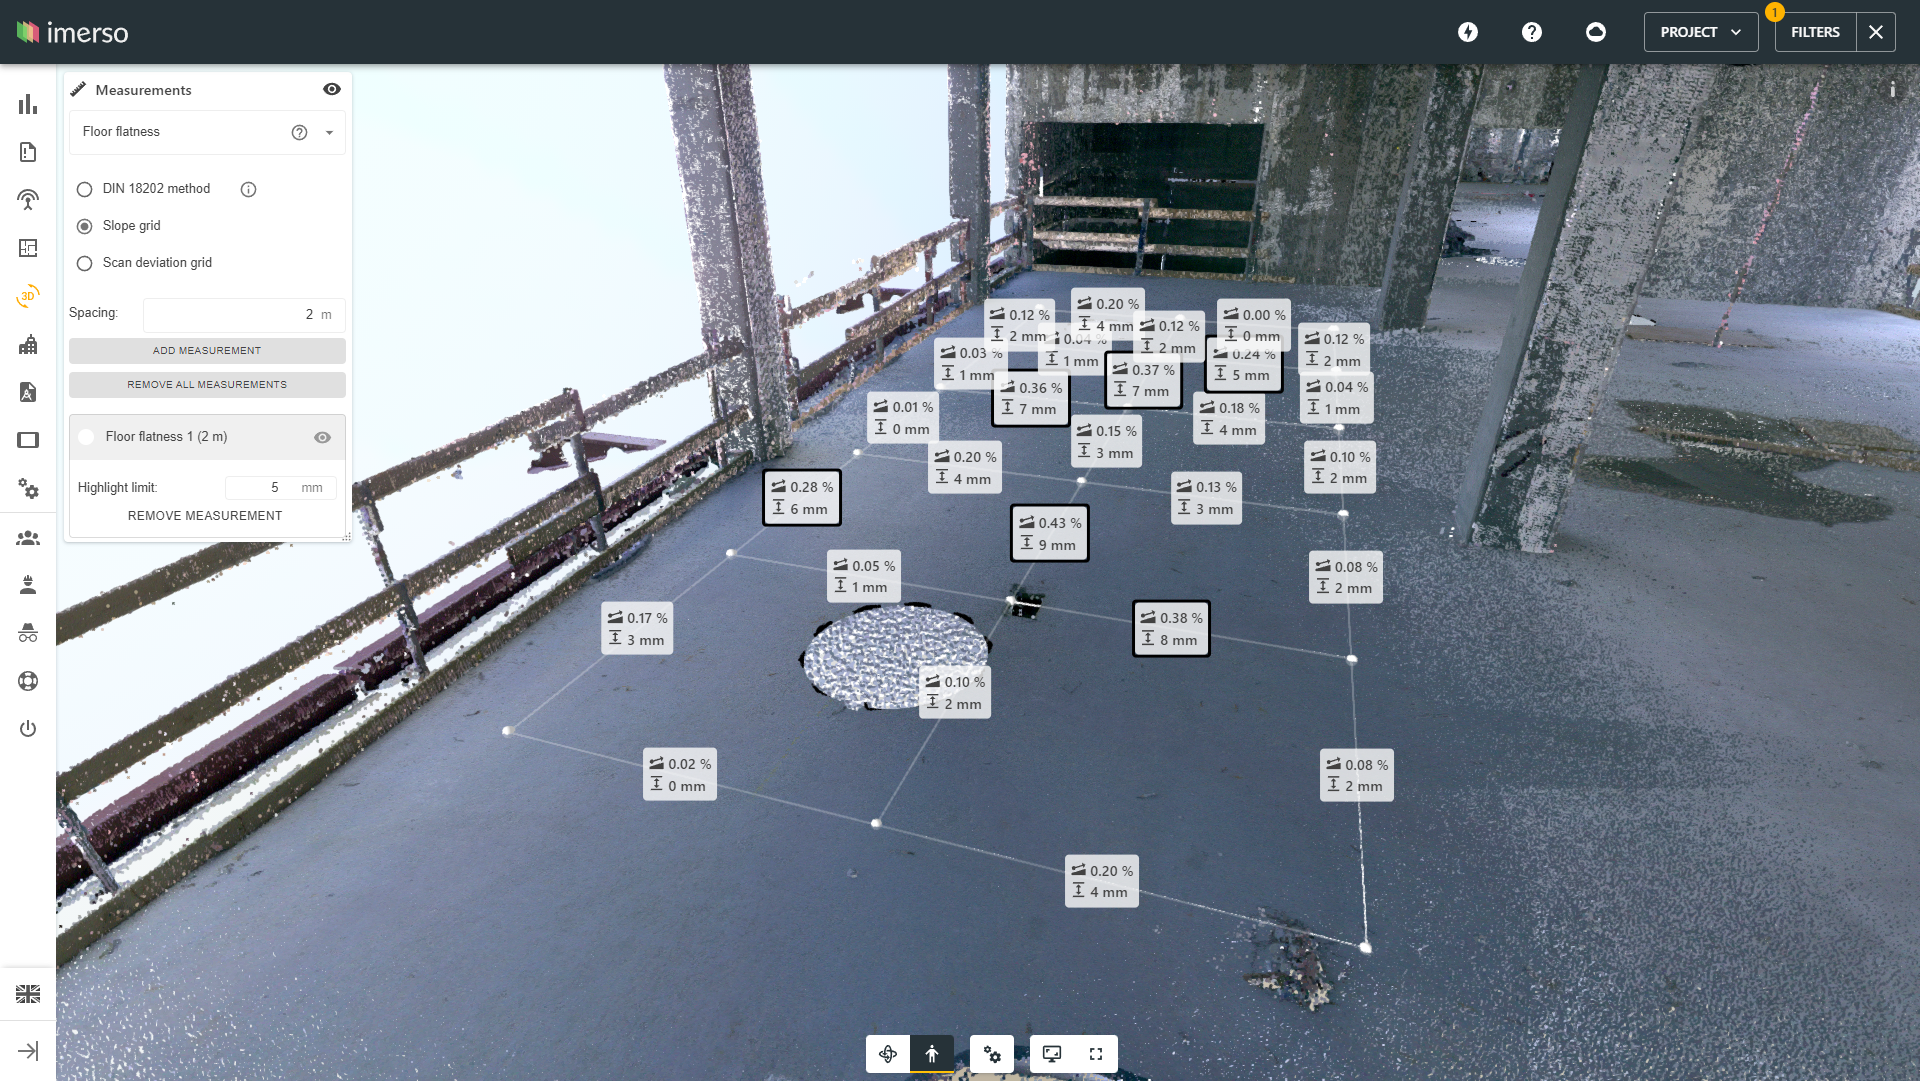
 - Slope grid, where both slopes and height differences are shown on the grid. This method allows checking both the flatness and levelness of a floor.
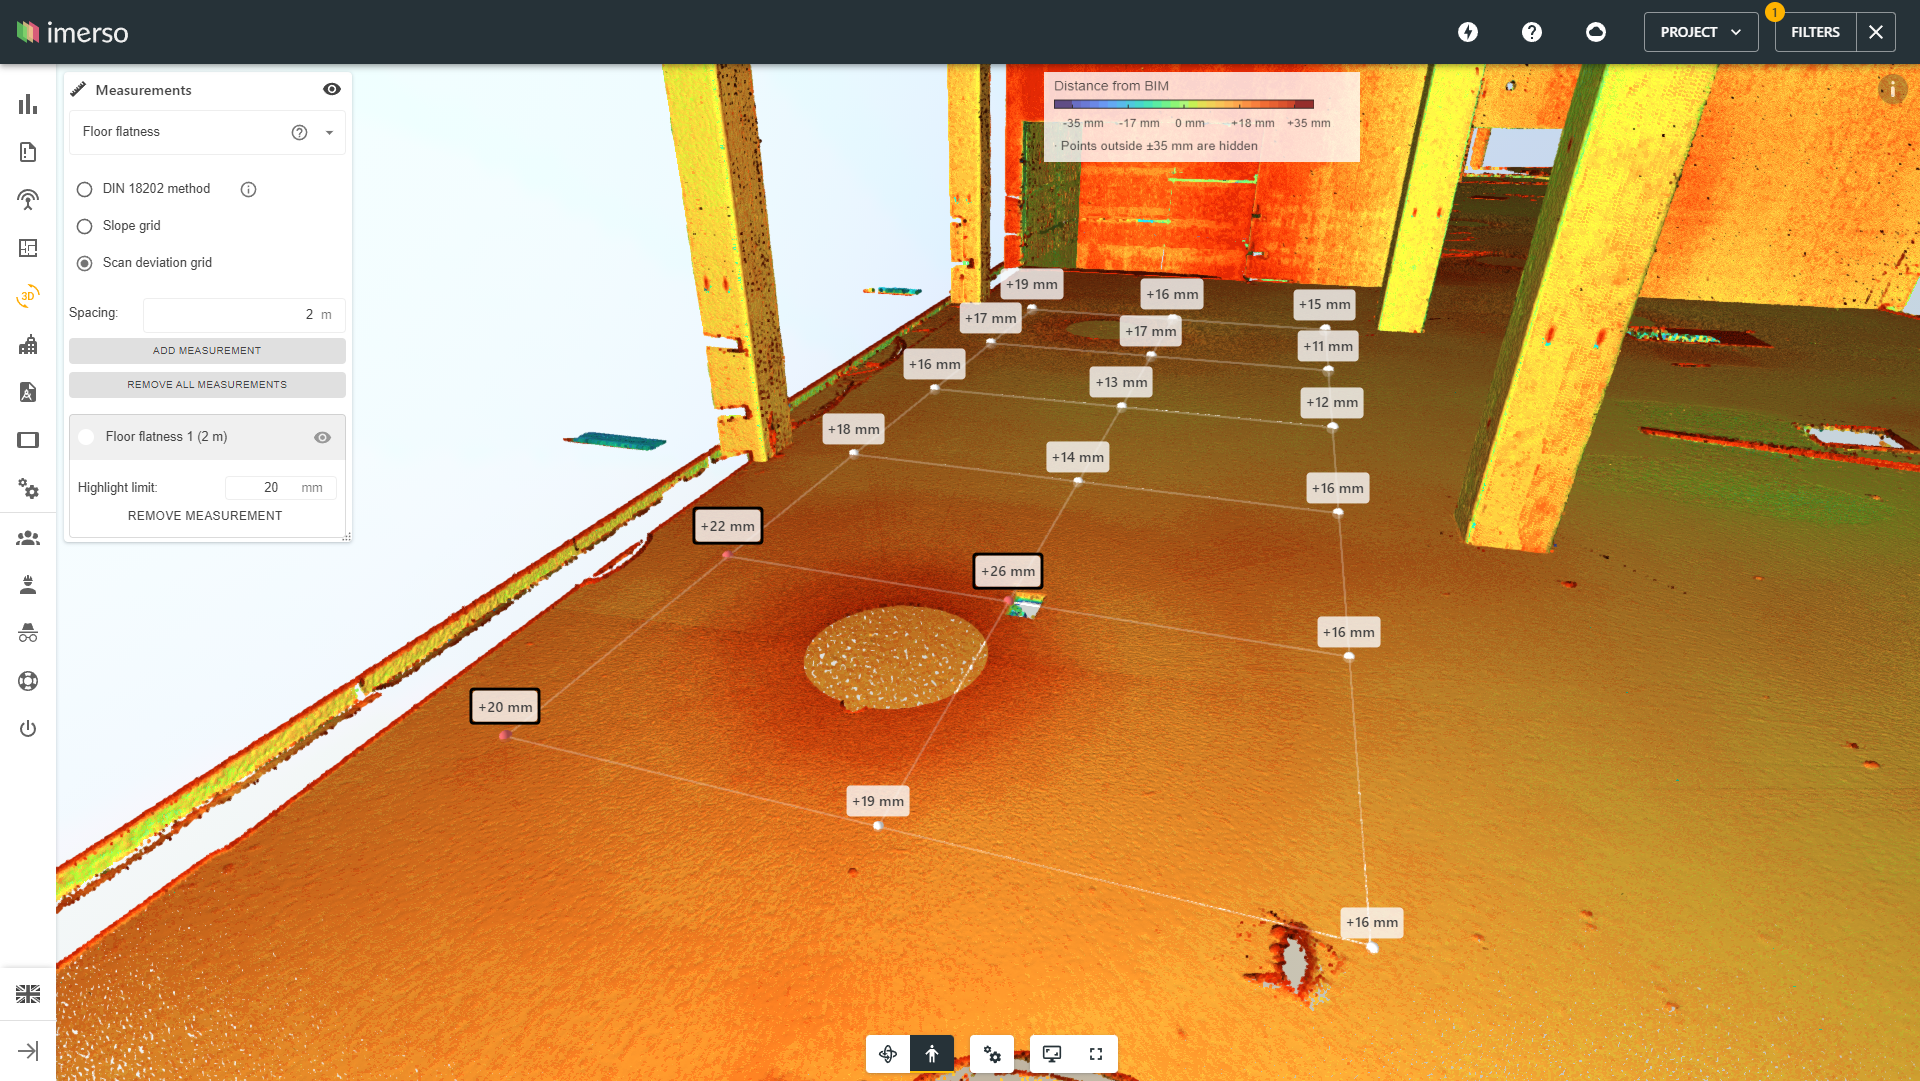
- Scan deviation grid, a color-coded method that shows the discrepancy between the scan and the BIM model. In addition to providing insights into the evenness and levelling of the floor, you can also verify whether the floor was placed correctly and if the correct quantities was used. A small difference in the floor thickness can make a big difference on the concrete bill... Using Imerso, these deviations quickly become visible and can be reported objectively.
Step 3: Document and Report Discrepancies with Details For Fast Resolution in Seconds
Surface Analyser not only checks deviations of your surfaces but also streamlines your documentation process. In the event of problematic surface discrepancies, you can document and report the case in seconds, simply by creating a new issue card directly within the viewer.
This feature enables seamless collaboration and easy sharing of surface inspection findings with your team. Use it to save valuable resources, and ensure accurate documentation by eliminating the need for time-consuming site visits.
Imerso’s customers span 13 countries and include renowned construction companies like Vinci, AF Gruppen, Betonmast, Drees & Sommer, NCC and frankly, we’re very proud of the results:
When and Where Should You Use Imerso For Floor Construction Inspections?
You can leverage Surface Analyser for any type of project at any time during the construction stage and onwards.
Most of our customers use Imerso in:
- Commercial constructions, such as office centres, malls, hotels, etc.
- Industrial constructions, such as factories, plants, warehouses, and specialised facilities.
- Public constructions, such as hospitals, universities, and swimming halls.
- Residential constructions, such as apartment buildings, senior housing, etc.
So, if you have a project in mind, go ahead and book a demo with our team>>.
Conclusion
Imerso's Surface Analyser revolutionises surface inspection and documentation by:- providing comprehensive measurement and analysis functionalities,
- simplifying the analysis process, and saving time,
- enhancing collaboration within construction projects.
About Imerso
Imerso is a software platform that combines BIM, Reality Capture, and AI technologies to automate construction site supervision and quality inspections with one simple workflow. We help construction companies cut project risks and delay costs with real-time monitoring of site status and work quality. Here are 7 Powerful Ways of Using Imerso to Supercharge Your Construction Projects.


.png?width=200&height=200&name=Lean%20Guide%20compressed%202%20(1).png)
Comments